Showing posts with label cards. Show all posts

Thursday, September 13, 2007

More VSN Challenges

My photo could be better, but I'm still not a pro at Adobe Photoship so extend grace to me please!

Here is the challenge and there on the left you see my answer to it. When this challenge was first posted, I was so excited. I'd never stamped on candles before and I'd been thinking of including them as one of my Christmas Gifts Class projects. I was so excited and then...I realized I did not have a proper colored candle in the house!

I decided to search anyways and, buried deep underneath a pile of votives, I found this vanilla one we'd received for free years ago when we bought a rocking chair at a local furniture store. Ok, I was so excited again!

And how fun was this! It was like magic watching my stamped images transfer to the candle. Sort of like the first time I learned heat embossing and saw the powder turn to liquid gold. I used Stampin' UP's Natural Beauty stamp set (retired) with Chocolate Chip ink. I colored the images in with markers. I just love this set and I don't care if it is retired and I'm a demo. I'm still using it! It has so many beautiful, soft images that just beg to be colored. What really drew me to this set is the word collage image (see card below). I finished the candle off with some gold cord. This will make a pretty gift, don't you think?

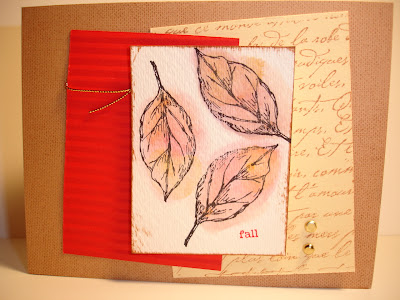
This next card was for this challenge. I already knew I wanted to use the bleached background I'd made several days ago with the French Script background stamp (also retired). (Speaking of bleaching, I need to upload the October Technique Tuesdays class projects... this week, I promise...). I found the perfect leaf almost immediately when I dashed outside to search.

I used my brayer to roll Green Galore ink over the leaf, then pressed it to Whisper White cardstock. I rolled over it with a clean brayer to make sure all the ink transferred to the cardstock. I then cut it out with my paper snips (super sharp and very good at cutting into small places) and glued it to the background.

I then used Elegant Eggplant ink to stamp the word collage from Natural Beauty (the same set I used on the candle above) on vellum. I stitched the piece to the card with linen thread.

I then glued the whole thing to Lavendar Lace cardstock and edged it with a Uniball Signo White Gel Pen. Even though I had 45 minutes to complete this challenge, this card came together in under 30 minutes. I told you in my last post, once I get going with a stamping or two, the ideas really start to flow.

If you've never stamped with nature's wonders, head outside for a hike and see what you can find! Pretty much anything goes...I've seen scrapbook pages with twigs stitched on! S-t-r-e-t-c-h your creativity!

Now go create!
- Nicole

Wednesday, September 12, 2007

It's The Great Pumpkin, Charlie Brown!

A few days ago I told you how I spent Saturday afternoon participating in Splitcoaststampers (SCS) Virtual Stamping Night (VSN). It was my first one ever and I'm already eagerly anticipating the next one! SCS also has Virtual Scrapbook Weekends. I believe one is coming up in October or November and I plan to participate in that, too.

The hourly challenges are an incredible boost to your creativity. So many of you have told me, with a sigh, "I'm just not creative." These challenges will prove you wrong! When you have just 45 minutes to come up with a card or other project (start to finish), you start going with the first thing that pops into your head. And since you're going on your first impulses, your project almost always looks fine (I've found that overthinking is the #1 creativity killer). Like with anything else, the more you stamp, the better you'll get.

I find that I start out slowly. The wheels turn creakingly, I struggle to implement an idea, and my finished project looks a little rough around the edges (hence why you will not see here the first card I did for my first challenge LOL...that is, unless you can find it on SCS's site...). But the second project comes more easily and looks better. By the third one I've fully hit my stride and I can't put my ideas on paper fast enough! You can ask friends that I've scrapped with...I'll burst out with, "I know!" or "Ah-ha!" or "This will look so awesome!" and I dash around, snatching tools and paper and embellishments off my studio shelves, working quickly before the idea flits away. They laugh at me, but they still invite me back LOL!

So this card was made for this challenge here. As I read the synopsis of "It's the Great Pumpkin, Charlie Brown!" I saw that Charlie Brown's ghost costume had 18 holes in it (instead of the normal 2 for the eyes). I laughed and then did an, "I know what I'll use!" I have this cool bubble punch from Creative Memories that I've never used. Then I realized it would make a great background for a giant pumpkin.

I got to work.

I swiped Chcolate Chip ink over my Chocolate Chip card front. I used a scrap of Garden Green cardstock (I just pulled it out of my scrap bin and used it exactly as it was, no cutting at all - I had only 45 minutes, remember?) to punch holes into, then swiped more Chocolate Chip ink over it. My pumpkin was made with a Coluzzle, using the oval template. I cut 3 ovals from Pumpkin Pie cardstock then sponged them with Pumpkin Pie and Chocolate Chip ink to add some visual depth. I ran a tiny scrap of Close to Cocoa through my crimper, then sponged more Chocolate Chip ink on for the stem. The vines were done with paper yarn that I twisted around my finger to curl a bit. I stamped "hope" from Everyday Flexible Phrases onto a jewelry tag, then attached it to the card with linen thread (I used "hope" since Linus spent all night in the pumpkin patch believing the Great Pumpkin would come).

My next blog entry I'll show two more challenges I did. One is not a card, but does involve stamping.

Now go create!
-Nicole

Monday, September 10, 2007

I meant to go running Saturday morning. I really wanted to go running Saturday morning. I'd gotten up early to go running (like 5am early) and as I was sitting outside, lacing up my running shoes, there was a big flash of lightning. I tore off my running shoes and dashed inside and that ended any thoughts of running.

It was probably so-called "heat lightning" (is that for real, by the way?) and I could have probably safely gone for a run, but I'm chicken when it comes to lightning. If I hear a rumble of thunder even, I scramble for cover. The irony is that I LOVE thunderstorms (one June we had one everyday for the entire month and I absolutely loved it!), but I love them most from a sheltered spot. Hey, The Weather Channel backs me on this one...don't they always say to take cover when you see lightning? I'm just listening to the experts...(Alexandra Steele, Paul Goodlow, Jim Cantore, Stephanie Abrams, and Mike Bettes have never let us down LOL!) (Wow, do I really know the evening crews names? Brian and I are such geeks LOL)...

So anyways, since I "couldn't" go running and I was awake, I decided to stamp something. I headed for my craft table and my eye fell on this Real Red cardstock I'd bleach-stamped snowflakes on about a week ago. I had been playing around with this technique for next month's Technique Tuesdays class and had made a bunch of pieces, which were lying in a stack on my craft table.

I cut my Bashful Blue cardstock to 2-3/4" x 11" and folded in half (this size gets you three cards from one sheet with virtually no scraps and fits into Stampin' UP's fun small open-ended envelopes). I glued my bleached snowflake background down and then used the paper piercing tool from the Crafters' Tool Kit to make a border. Using Bashful Blue and Real Red Classic Inks, I stamped the same snowflake (from Seasonal Whimsy) onto vellum, which I then tore. I glued this over my background. I stamped "Happy Holidays" (from the retired Warmest Regards set) in Real Red ink onto a scrap of Bashful Blue, used my Crop-A-Dile to attache silver eyelets, then strung silver cord through the eyelets and around the card. I used the paper piercer to put a hole in the card fold for the cord to go through.

This card came together fast and I really love pretty much everything about it. Bashful Blue and Real Red is one of my favorite color combinations - the contrast is so striking and I like how one calms while the other excites; vellum is a super way to overlap backgrounds; you can never go wrong with tearing paper LOL (my comfort technique); silver cord and paper piercing always seem to finish a card off perfectly.

The bleaching technique was so fun! I have more cards to share with you using more card fronts I made with bleach, so be sure to come back for those. Also, I invite you to Technique Tuesdays class - bleaching is one of the techniques we'll learn in October and they are really a lot of fun. The ladies who attend are a fun bunch, too!

Now go create!
-Nicole

Sunday, August 26, 2007

Babies Galore!

My circle of family and friends is experiencing a baby boom right now. Since March, there have been 4 babies born and my sister-in-law is expecting any hour (literally...she's a week past her due date). And there's still 2 more babies to arrive later on! This "baby boom" count does not even include the women within my Stampin' UP circle who've recently had little ones arrive.
I am One Happy Stamping Lady from all this! My baby stamps sat neglected for so long and I was wondering if I'd ever get to use them before my grandkiddos arrived (ok, I'm exaggerating there, but my point...)
What's even more wonderful about all this is that almost everyone has had a boy (there's been just one girl, to be specific). So not only have I been able to bust out the baby stamps, I've been able to stamp blues and greens! (I have 3 girls so I'm drowning in a million variations of pink and purple).
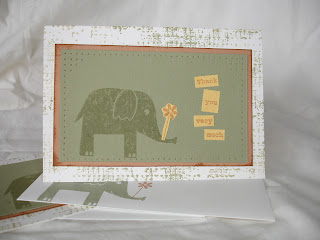
For those new arrival gifts, I've been creating thank you cards with matching envelopes. I used these pre-scored notecards and envelopes.
I've been just giddy at my craft table, giggling gleefully as I stamp blue polka-dot backgrounds and blue giraffes and - hey!- a green elephant! I pulled out a pack of baby-themed patterned paper I've had for several years and punched up the blue sheets. And I'm not done since there are more babies to come!
If you know of any little ones soon to arrive, consider stamping a gift for the baby and mom-to-be. Or just stamp a gift card holder or tag to wrap around a soft fleece blanket.
Speaking of babies, I've been getting lots of leftover packaging from baby-related items from a good friend. I plan to put it all to good use and once I do, I'll showcase here what I've made, so stay tuned!
Now go create!
- Nicole

Sunday, August 12, 2007

More Faux Sponging

Here's the next project I made using the Faux Sponging technique. If you read my last post, you'll remember I received this technique in a tutorial from another Stampin' UP demo, Erika Martin. I kept my card layout the same as hers in the tutorial, but I used different colors and stamps.
When creating this card, I knew I wanted to send it to my fabulous up-upline, Cherie Hunt, as a congratulations for all her achievements and awards at the recent Stampin' UP convention. She has such a beautiful soul and is always willing to help any of us in the Creative to the Core group (and there are over 50 of us now!). Cherie works hard at her business but she does it all out of genuine love, and I'm thrilled to see her being rewarded for it.
This card measures 4-1/4" x 5-1/2" and fits in a medium sized envelope. I used Taken With Teal as my card base and smallest layer, Pink Passion for the biggest layer, and Pretty in Pink for the middle layer. I used the Heartfelt Thanks stamp set for the image and word. Both were embossed with silver embossing powder. I added silver cord as a final touch (this particular silver cord is retired, but the upcoming Holiday Mini will have elastic silver cord). The edges of my card were brushed with Versamark ink and run through a pile of silver embossing powder.
Cherie, if you're reading this, you're the best!!!!! :)
Now go create!
-Nicole

Sunday, July 29, 2007

A great case of improvisation

I've always been a firm believer in making do with what's on hand. I create meals with what I have, rather than making specific lists of what a recipe calls for. If the girls want to set up some fantasy playground for their Barbies, we scrounge around the house for items and fashion something remarkable (and given all the Stampin' UP boxes I have lying around, those Barbies have a dream playplace, let me tell you!).
Same goes with my crafting. Rather than getting all the latest and greatest, I challenge myself to use what I have. Don't get me wrong - I love to buy new stamping and scrapping supplies as much as the next person and I DO get new things from time to time. But I make sure those new things are v-e-r-y stretchable, that I can use them a million different ways. Being creative isn't about having everything and making something from that - it's about making something from nothing (or next to it)!
One of my downlines, Kim Moslen, took this creed to heart when making this card. She showed it to me at the July Technique Tuesdays class and I loved it. Kim told me she'd found the card design on Splitcoaststampers and CASEd it (CASE stands for "copy and share everything"), but she changed the colors and did two other substitutions.
First, see that Always Artichoke cardstock strip with the Regal Rose dots? Kim said that was polka-dotted ribbon on the original card, but she didn't have any like it, so she created it from what she did have (a circle punch and cardstock). Brilliant!
Second, instead of using the ticket corner punch on the focal piece of the card, she used her circle punch. Kim flipped the punch upside down so she could see where she was placing it on her cardstock, slid it in so that only half the circle was on the cardstock, then punched. Again, brilliant!
I challenge you to find a card or scrapbook page you like (check out my blog, of course *wink, wink*, the Stampin' UP catalog, or Splitcoaststampers). Study it for a bit, then poke around your stash to see how you can recreate it with what you have.
Now go create!
- Nicole

Friday, July 13, 2007

Where did my crafting time go?!?!

I was supposed to have stamping time the other day, when my new box of Stampin' UP goodies came. That never materialized :( Little bits of life intervened and, although I did get to START a project, I never got to FINISH it. And I have to finish it before I can post it for you to see LOL!

The good news is I got to use Wild Wasabi ink and cardstock and I at least handled the Wild Wasabi double-stitched ribbon (which will be a part of my project). Oh, and I used my new scallop circle punch. So it hasn't been a total bust.

I still have other projects to show you, though! I know SOOOO many ladies having babies, or who just had babies and it's been great because I get to pull out my baby stamps, which sat unused for too long. Here's a card I did for a couple who just had their sweet little ones.


I got this set, Wild About You, in the mail recently as part of a Stampin' UP demonstrator promotion (can I just say how much I LOVE this company?) and I've been having a blast with it. Because of the solid images in this set, you can do a variety of techniques (like kissing and a faux shaving cream background, both of which I've done at my monthly technique classes). Plus, the animals can be used for little boy or girl projects.

I used the card sketch from this SCS challenge.

Supplies all SU!, unless noted : (stamps) Wild About You, Big Deal Alphabet, Expressive Flexible Phrases (paper) Bashful Blue, Certainly Celery, Barely Banana, Whisper White (ink) Brocade Blue, Certainly Celery, More Mustard (other) Round Tab Punch, Cuttlebug Tiny Dots Embossing Folder, sewing machine and thread

Now go create!
---Nicole


Tuesday, July 10, 2007

I've got that "stamping high"!

Tonight was my monthly Technique Tuesday class and, once again, it was such a fun evening! What an adventurous bunch of ladies that come to these. And this month there were several new faces, which always adds to the excitement. Brian groans when I get home from these because he knows I'll be talking his ear off about my evening and how cool this or that was and look at this color combination and guess what so-and-so did with her card, yada yada yada (stolen from "Seinfeld" but it used to be my favorite show :)

Here's one of the cards we did tonight. This one features Watercolor Monet.

Click here to see what next month's class is all about---->>>
Technique Tuesdays Class

Supplies, all Stampin' UP: (stamps) Natural Beauty, French Script, Linen, Everyday Flexible Phrases (Paper) creamy caramel, barely banana, real red, watercolor (Ink) creamy caramel, real red, Jet Black Staz-Ongold cord, gold brads, crimper, Watercolor Wonder Crayons, sponge daubers

Now I'm really looking forward to tomorrow - I should have some decent crafting time as we're home all day and all night, PLUS there's very little housework to be done! Yay! I have a box of new toys arriving from Mr. Brown tomorrow so it's perfect timing. Tune back to see what comes out of it!


Monday, July 9, 2007

Can ya feel the heat?

Oooohhh, I can! We have no air conditioning in our home - which is brick, by the way - and it is now much toastier on the inside than the outside. Brian and I contemplated pitching a tent in the yard and sleeping under the stars LOL!

Oh well. I grew up with no a/c, my school had no a/c, I don't have an office job in a/c, so it's not like I've grown accustomed to it. Besides, what would summer be without a little HEAT? Gives us all a reason to s-l-o-w d-o-w-n and go to the pool. Gives ME a reason to escape to my BASEMENT STUDIO to PLAY hehheh.

In honor of summer and it's long hot days, tropical-like weather, and fun-in-the-sun here's a fun pop-up card I created. I demonstrated this pop-up feature at a workshop last summer and got a great reaction. It is rather a nice surprise to open it up and have this cute frame jump out at ya!

To make this, cut a strip of paper slightly longer than the width of your card (i.e. if your card is 8-1/2" wide, cut the strip 8-3/4"). Score 3" in on both sides, then score at 4-3/8" (the halfway point). Fold your cardstock at that halfway point, then fold going the opposite direction each end at the 3" score marks. Use a punch to create the frame in the strip.

The fun of this card is that you can use just about any shape punch - circles, squares, ovals, tags! Just cut the heigth of your cardstock strip to accomodate the size of your punch. You can also use patterned paper for the inside strip.

Have fun with this!


- Nicole


Monday, July 2, 2007

The Second Day


Woo-hoo, second day on the blog!

This is a card I made awhile back for a workshop on watercoloring. The hostess had requested this technique and I was oh-so-happy to oblige! (I love hostesses with a sense of adventure ;) ). I needed a very simple project and this 3x3 gift card is what I came up with. The size is adorable, the colors are so fun and so is the stamp set - Polka Dots & Paisley.

I cut a 3x6 piece of Lovely Lilac cardstock (tip: using a 12x12 sheet allows you to get 8 of these without any leftover scraps), scored at the 3" mark on the long side, then folded. Using Elegant Eggplant ink, I stamped the polka dots in the center. Then I used
Staz-On Jet Black to stamp the paisley on Naturals Ivory cardstock and colored it in with Bold Brights Watercolor Wonder Crayons and an Aquapainter. I cut this out and glued it to the center of the gift card.

Using the uber-cool
Round Tab Punch, I punched a tab from Yoyo Yellow cardstock, folded it, and used SNAIL to adhere it to the top left of my card. I stamped "laugh" and "*" from Everyday Flexible Phrases on the tab. The great thing about that set is it has 56 words and symbols in it, so you can make your cards say whatever you want them to!

You know you want to be a "charter reader" of this blog, so sign up over to the left and consider it done...and thanks for reading!

Saturday, June 30, 2007

Never Say Never

I'm a blogger!!! Two years ago when I first heard of blogs, I wondered why anyone would want to publish for the world to read what, to me, was basically a diary. Now I'm so excited to be blogging I'm jumping out of my skin to hit "publish"!

Hmmm....this reminds me of my initial reaction to rubber stamping..."I scrapbook. Why would I want a drawerful of wood and rubber? Seems useless." I'm beginning to think I should never say never LOL!

I began to think about blogging when I realized how much I love to share what I create and how much I love seeing what others have created. I'm totally new to this and although I have a computer geek for a husband (he's a senior programmer by day), he refuses to come close to anything stamping or scrapping related LOL! So, bear with me as I figure this thing out. I'll call it an adventure in blogging and leave it at that LOL!

Ok, for my very first post I'm showing you a card I made a couple days ago for a wonderful lady I've met through Stampin' Up! I haven't mailed it yet because I have to make it to the post office for a pesky 2 cent stamp, but Sandy, it will be coming to you!


I had just gotten a trade stamp set in the mail that afternoon (Natural Beauty, a retired Stampin' Up! set) and I couldn't wait to use it! I knew I wanted to watercolor my image so I stamped the flowers using Palette Hybrid Noir ink on watercolor paper. I used my Watercolor Wonder Crayons (Bold Brights) with my Aquapainter to color the image in. I mounted it on a Tempting Turquoise panel that I trimmed with my scalloped scissors. I used a marker to ink up just the "beauty" part of the word stamp in this set and stamped it on Very Vanilla cardstock. I used my Word Window punch to punch it out, then trimmed one end straight. Stuck a silver brad through the end, mounted it on the card with a Stampin' Dimensional, and tied some narrow ivory organdy ribbon through it.


Now the background on my Marigold Morning base was done using a cool technique known as Faux Flocking. Apparently, it was a popular wallpaper texture in the '60's and it's now being brought back to the papercrafting community! I think it looks better on a card but I wasn't here in the '60's so what do I know ROFL!

What I love most about this card is the color combination of Marigold Morning and Tempting Turquoise. Marigold Morning is part of the now retired 2006-2007 In Color line from Stampin' Up! (but the new In Color line is FABULOUS!). I don't see it put together too often and it's such a cheerful look.

If you'd like to be emailed when I post to my blog, just sign up in the box along the left side of this page. Otherwise, keep checking back to see what else I have up my sleeve!