Thursday, September 27, 2007

Sliding back into the blogging groove...

Wow...I've been "away" for a long time (long by blogging standards). I have a reason, though. I had a lot of Stampin' UP events (like 4 in the past week) plus the regular mother/wife/housewife responsibilites and...well....blogging just didn't happen.

But I'm here now and have something very fun to show you!

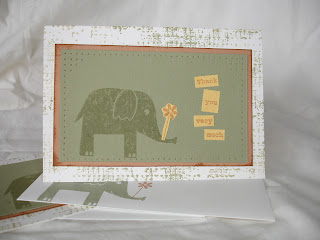
I had some extra crafting time a couple weeks ago while Caitlin and Alaina were at Mother's Morning Out (those ladies run a wonderful ministry there, by the way) and Emma at school (yet another wonderful ministry). So, I decided to try my hand at a slider card. Really cool card - you pull the left side (where the white bit is sticking out from the half circle punch) and it also pulls out the right side. Magic!

I had some trouble with this at first. I couldn't wrap my mind around just how the slider thing worked. You use a cut up plastic shopping bag to make the card slide and I couldn't read the tutorial right for those steps and I couldn't figure out where to put the adhesive to make it all slide right. It took me about 15 minutes to figure it out and, being the frugal paper crafter that I am, I kept carefully peeling the cardstock apart rather than tossing it and starting anew.

There's something to be said for perseverance, however, as I did get it finally! And boy was I happy with the results! I created the card knowing I wanted to send it to a "little" girl I was a nanny for years back when I was in college. The "little" girl is now a freshman in college herself! I wrote the message before I took the picture so that's why there's writing on the card.

To see the slider card tutorial, click here.

Here's my supply list if you'd like to CASE any part of my card:

stamps - You Make Me Happy (retired)
ink - only orange, brilliant blue, green galore, yoyo yellow
paper - green galore, whisper white, only orange
other - ribbon (Wal-Mart, run through yoyo yellow ink pad), corner rounder punch, 1-1/4" circle punch, sponges

Now go create!
-Nicole

Tuesday, September 18, 2007

Why haven't I made one of these before?


Another challenge I participated in was this one here. I was excited when I first read this because I'd never made a waterfall card. There are SO many different kinds of folds I've never tried still and I'm eager to get around to them.

When I showed this card to one of my regular customers/class attendees, her first words were, "When are we making this?" I've been wanting to do a Fabulous Folds class for several months now, but I've had other stamping events going on - maybe now is the time to plan one!

I had just 45 minutes to make a waterfall card and since I had no idea if I was going to have trouble with it or not, I went with my first instinct - to use Wild About You and make this a kids' birthday card. I figured a child would REALLY enjoy the interactivity of this project.

Since I knew I wanted this to be for a child, I chose bright colors - Purely Pomegranate, Brilliant Blue, Wild Wasabi, Yoyo Yellow, Brocade Blue, and Garden Green. I also decided to use the polka dot stamp from Polka Dots & Paisley for the card front's background. It added nicely to the "fun" feel.

The tutorial to make a waterfall card is readily available here. Good, precise scoring is essential to the card flipping properly so pay close attention to those steps.

You can see in this photo that when you pull down on the ribbon, each image flips over and folds behind the next image. Once you've viewed all the images, you slide the ribbon piece back up and the images flip over each other in reverse (the "waterfall").

The "wild about you" stamped words on this project are actually on one stamp. To stamp just one word at a time on each square, I used a water-based marker to color in the word I wanted to stamp. I then "huffed" or breathed onto it to remoisten the ink, then stamped on my cardstock. When using this technique, you must clean your stamp very well between stampings. If you don't, you'll get faint images of the other parts of the stamp that you weren't intending on stamping! I like to use my Stampin' Mist and Stampin' Scrub several times between inkings to ensure the stamp is perfectly clean.

I did complete this challenge in the 45 minutes allotted, despite having never made a waterfall card before. The secret was to not second-guess myself in the design department. I did not stress over the stamp sets or colors. I just went with whatever popped into my head. It's so awesome and freeing to create like this! Try it!

Now go create!
-Nicole

Sunday, September 16, 2007

Christmas Card Stamp-A-Stack


I still have a few more Virtual Stamp Night Challenges to post (I really did spend all day stamping last Saturday!) but I have to "interrupt" those posts for this one.


My first Christmas Card Stamp-A-Stack is this Saturday, September 22 and I wanted to show 2 more cards we'll be doing at this event. You can see 2 other cards here.

In addition to the traditional red and green, I wanted to have some nontraditional Christmas colors on these cards. I saw the Pixie Pink and Wild Wasabi combination on a sample in Stampin' UP's Fall/Winter 2007 Collection and just loved it. Christmas can be such a joyful and fun time of year and this card certainly reflects that!


This next Stamp-A-Stack card is much more traditional - you have your reds and greens (Bravo Burgundy and Old Olive) with a bit of gold thrown in and the effect is more understated.

The Stamp-A-Stack is this Saturday, September 22 at 2pm. You'll make a total of 10 cards (2 each of 5 different designs) and you'll receive envelopes that you can stamp to coordinate! We'll be stamping at the Sewickley Public Library in their spacious Community Room. There's no hurry to this event, the cards are very doable for even the newest stamper, and I guarantee you'll have fun! Click here to see more details and to find my contact information.

You can also email me to sign up for my mailing list, where you'll be kept in-the-know on my latest stamping events, specials, promotions, and other interesting and fun tidbits!

Now go create!

-Nicole

Thursday, September 13, 2007

More VSN Challenges

My photo could be better, but I'm still not a pro at Adobe Photoship so extend grace to me please!

Here is the challenge and there on the left you see my answer to it. When this challenge was first posted, I was so excited. I'd never stamped on candles before and I'd been thinking of including them as one of my Christmas Gifts Class projects. I was so excited and then...I realized I did not have a proper colored candle in the house!

I decided to search anyways and, buried deep underneath a pile of votives, I found this vanilla one we'd received for free years ago when we bought a rocking chair at a local furniture store. Ok, I was so excited again!

And how fun was this! It was like magic watching my stamped images transfer to the candle. Sort of like the first time I learned heat embossing and saw the powder turn to liquid gold. I used Stampin' UP's Natural Beauty stamp set (retired) with Chocolate Chip ink. I colored the images in with markers. I just love this set and I don't care if it is retired and I'm a demo. I'm still using it! It has so many beautiful, soft images that just beg to be colored. What really drew me to this set is the word collage image (see card below). I finished the candle off with some gold cord. This will make a pretty gift, don't you think?

This next card was for this challenge. I already knew I wanted to use the bleached background I'd made several days ago with the French Script background stamp (also retired). (Speaking of bleaching, I need to upload the October Technique Tuesdays class projects... this week, I promise...). I found the perfect leaf almost immediately when I dashed outside to search.

I used my brayer to roll Green Galore ink over the leaf, then pressed it to Whisper White cardstock. I rolled over it with a clean brayer to make sure all the ink transferred to the cardstock. I then cut it out with my paper snips (super sharp and very good at cutting into small places) and glued it to the background.

I then used Elegant Eggplant ink to stamp the word collage from Natural Beauty (the same set I used on the candle above) on vellum. I stitched the piece to the card with linen thread.

I then glued the whole thing to Lavendar Lace cardstock and edged it with a Uniball Signo White Gel Pen. Even though I had 45 minutes to complete this challenge, this card came together in under 30 minutes. I told you in my last post, once I get going with a stamping or two, the ideas really start to flow.

If you've never stamped with nature's wonders, head outside for a hike and see what you can find! Pretty much anything goes...I've seen scrapbook pages with twigs stitched on! S-t-r-e-t-c-h your creativity!

Now go create!
- Nicole

Wednesday, September 12, 2007

It's The Great Pumpkin, Charlie Brown!

A few days ago I told you how I spent Saturday afternoon participating in Splitcoaststampers (SCS) Virtual Stamping Night (VSN). It was my first one ever and I'm already eagerly anticipating the next one! SCS also has Virtual Scrapbook Weekends. I believe one is coming up in October or November and I plan to participate in that, too.

The hourly challenges are an incredible boost to your creativity. So many of you have told me, with a sigh, "I'm just not creative." These challenges will prove you wrong! When you have just 45 minutes to come up with a card or other project (start to finish), you start going with the first thing that pops into your head. And since you're going on your first impulses, your project almost always looks fine (I've found that overthinking is the #1 creativity killer). Like with anything else, the more you stamp, the better you'll get.

I find that I start out slowly. The wheels turn creakingly, I struggle to implement an idea, and my finished project looks a little rough around the edges (hence why you will not see here the first card I did for my first challenge LOL...that is, unless you can find it on SCS's site...). But the second project comes more easily and looks better. By the third one I've fully hit my stride and I can't put my ideas on paper fast enough! You can ask friends that I've scrapped with...I'll burst out with, "I know!" or "Ah-ha!" or "This will look so awesome!" and I dash around, snatching tools and paper and embellishments off my studio shelves, working quickly before the idea flits away. They laugh at me, but they still invite me back LOL!

So this card was made for this challenge here. As I read the synopsis of "It's the Great Pumpkin, Charlie Brown!" I saw that Charlie Brown's ghost costume had 18 holes in it (instead of the normal 2 for the eyes). I laughed and then did an, "I know what I'll use!" I have this cool bubble punch from Creative Memories that I've never used. Then I realized it would make a great background for a giant pumpkin.

I got to work.

I swiped Chcolate Chip ink over my Chocolate Chip card front. I used a scrap of Garden Green cardstock (I just pulled it out of my scrap bin and used it exactly as it was, no cutting at all - I had only 45 minutes, remember?) to punch holes into, then swiped more Chocolate Chip ink over it. My pumpkin was made with a Coluzzle, using the oval template. I cut 3 ovals from Pumpkin Pie cardstock then sponged them with Pumpkin Pie and Chocolate Chip ink to add some visual depth. I ran a tiny scrap of Close to Cocoa through my crimper, then sponged more Chocolate Chip ink on for the stem. The vines were done with paper yarn that I twisted around my finger to curl a bit. I stamped "hope" from Everyday Flexible Phrases onto a jewelry tag, then attached it to the card with linen thread (I used "hope" since Linus spent all night in the pumpkin patch believing the Great Pumpkin would come).

My next blog entry I'll show two more challenges I did. One is not a card, but does involve stamping.

Now go create!
-Nicole

Monday, September 10, 2007

I meant to go running Saturday morning. I really wanted to go running Saturday morning. I'd gotten up early to go running (like 5am early) and as I was sitting outside, lacing up my running shoes, there was a big flash of lightning. I tore off my running shoes and dashed inside and that ended any thoughts of running.

It was probably so-called "heat lightning" (is that for real, by the way?) and I could have probably safely gone for a run, but I'm chicken when it comes to lightning. If I hear a rumble of thunder even, I scramble for cover. The irony is that I LOVE thunderstorms (one June we had one everyday for the entire month and I absolutely loved it!), but I love them most from a sheltered spot. Hey, The Weather Channel backs me on this one...don't they always say to take cover when you see lightning? I'm just listening to the experts...(Alexandra Steele, Paul Goodlow, Jim Cantore, Stephanie Abrams, and Mike Bettes have never let us down LOL!) (Wow, do I really know the evening crews names? Brian and I are such geeks LOL)...

So anyways, since I "couldn't" go running and I was awake, I decided to stamp something. I headed for my craft table and my eye fell on this Real Red cardstock I'd bleach-stamped snowflakes on about a week ago. I had been playing around with this technique for next month's Technique Tuesdays class and had made a bunch of pieces, which were lying in a stack on my craft table.

I cut my Bashful Blue cardstock to 2-3/4" x 11" and folded in half (this size gets you three cards from one sheet with virtually no scraps and fits into Stampin' UP's fun small open-ended envelopes). I glued my bleached snowflake background down and then used the paper piercing tool from the Crafters' Tool Kit to make a border. Using Bashful Blue and Real Red Classic Inks, I stamped the same snowflake (from Seasonal Whimsy) onto vellum, which I then tore. I glued this over my background. I stamped "Happy Holidays" (from the retired Warmest Regards set) in Real Red ink onto a scrap of Bashful Blue, used my Crop-A-Dile to attache silver eyelets, then strung silver cord through the eyelets and around the card. I used the paper piercer to put a hole in the card fold for the cord to go through.

This card came together fast and I really love pretty much everything about it. Bashful Blue and Real Red is one of my favorite color combinations - the contrast is so striking and I like how one calms while the other excites; vellum is a super way to overlap backgrounds; you can never go wrong with tearing paper LOL (my comfort technique); silver cord and paper piercing always seem to finish a card off perfectly.

The bleaching technique was so fun! I have more cards to share with you using more card fronts I made with bleach, so be sure to come back for those. Also, I invite you to Technique Tuesdays class - bleaching is one of the techniques we'll learn in October and they are really a lot of fun. The ladies who attend are a fun bunch, too!

Now go create!
-Nicole

Saturday, September 8, 2007

A third layout...

You might be tired of seeing my kids by now...(this is the last layout I will show for awhile, promise!)...and they aren't the only subjects I scrapbook. However, they are the focus of my most recent layouts so that's why you are seeing endless photos of the three girly-girls.

So what else do I scrapbook if not my children? My husband - myself - friends - trips before children - I did an album for my paternal grandparents - I'm currently scrapping my maternal grandfather's WWII photos (which are all straight from the original negatives!) - I did an album of gourmet dishes my brother cooked (he liked to really "do up" the food presentation and do a photo shoot of the dish) - I created an album a few years ago for the sole purpose of going through the grieving process.

Really, anything is material for scrapbooking. I've made layouts just because there was a certain color combination I wanted to try, or a word I wanted to use. I have a layout with nothing but song lyrics on it. There's a LOT of creative freedom with paper, ink, and your thoughts. You get the idea.

The page pictured above was made to celebrate a huge accomplishment for Caitlin, our middle daughter (who's turning 5 October 2! Yikes!). She'd been struggling with going to the dentist and our 4th visit was a winner! You can read the journaling by clicking on the picture.

I cut a couple squares of patterned paper (Creative Memories) and glued them down to my cardstock. I used rub-ons (Basic Grey) to decorate the corners and bring your eye to the photo. I then used Whisper White Craft Ink (Stampin' UP) to stamp the title (Ma Vinci's Reliquary) and to add some contrast along the edges of my page. To add the contrast, I just brushed my ink pad roughly against the cardstock edges. I didn't think about it and it was a very random, imperfect thing. To finish the page, I outlined my photo with a black journaling pen and wrote the story in the lower left quandrant. Caitlin was too tickled that I'd made a whole scrapbook page about her (successful) dentist trip - her smile was the best!

I'll have loads of projects to show you in the coming days. I've spent most of today participating in the Splitcoaststampers Virtual Stamp Night/Weekend (VSN). This was my first time and it was a blast! A different challenge every hour, only 45 minutes to complete it - man, did my creativity just flow! When I can really dig deep into my supplies and play for hours, everything comes so quickly and easily. So make sure to stop back to see what came from my day of being challenged.

Now go create!
-Nicole

Friday, September 7, 2007

The second layout...

This next layout is a very simple one - both in style and in the execution. Simple is unusual for me. I rarely scrapbook simple. I love putting all the details in my layouts, little bits and pieces that draw a person in, making them want to know what I'm trying to say.

So why did I go simple and easy with this one?

Well...it's not a fancy answer, I'm afraid. It's actually a rather practical answer. You see, I was planning a workshop for a hostess who was looking to get into scrapbooking. Nothing will turn a newbie off this hobby faster than throwing gobs of embellishments onto a page. I didn't start out that way and no one else I know did, either!

I decided to go with bright colors and fun pictures since those would make the layout visually stronger. Next, I planned out a simple but cute design using a Simply Scrappin' Kit (this particular kit, Friends & Flowers, was a hostess item in the previous Stampin' UP catalog). In this post here I talked about a class I had using one of the kits to make cards and a co-ordinating card box. This layout above shows how you can use them for their obvious purpose. And the Simply Scrappin' Kits really do make scrappin' simple! There are a LOT of fun choices in the current catalog. I especially like Winter Bright - how fast could you make up those Christmas cards? Each Kit's cover sheet comes with layout ideas for different sized scrapbook pages, cards, and 3-D items, so you have some help getting your creative juices flowing.

This entire layout is from the Friends & Flowers Simply Scrappin' Kit, except for the title. I used the On Board Simon Lower chipboard letters (I left them naked, but you could use Whisper White Craft Ink to stamp little images on them or tie bunches of Ribbon Originals around them). I had already used the "i" and "l" on another layout so, using the leftover punched out space as a template (otherwise known as negative space), I sponge daubered Certainly Celery ink. I tied some linen thread through a button (Fresh Favorites II) then adhered it with a glue dot as the dot of my "i".

I did not come up with this layout all on my own. I saw a similar one in Stampin' Success, the magazine I receive as a Stampin' UP demonstrator. I loved how large the title was and how the photos could really pop on this design. I knew it would be perfect for a workshop.

It really is ok to "steal" inspiration! When I look at just about everything I've created, it almost always began with a technique or color combination or stamped image or something that I saw on someone else' s project. I take that one little idea and it snowballs for me into my own creation. In this case, I had to break out of my usual style and so I turned to trusted sources for ideas - and I really really liked it! Who knew simple could be so nice?

Now go create!

-Nicole

Thursday, September 6, 2007

The first scrapbook layout...


(Click any photo for a more detailed view).
Our family room was finally finished about a month ago (after 15 months of being under construction!) and my husband did such a fabulous job of it that I actually want to hang out there now. Pre-remodeling it had this ugly dark brown indoor/outdoor carpet and a hideous wall color (I did a bad job choosing the paint color years back) and it was dark, gloomy, and...well...the room gave me a creepy feeling.

When we remodeled, I told Brian that I wanted a room that "felt cozy" - those were my only directives! And he did it! We kept all the old furniture but the new carpet and paint color and removal of a chair rail and some other finer details have made this a room I WANT to be in!

Even better, Brian said I could move my craft table out here!!!! What does this mean? I craft more! I get to hang with Brian at night AND stamp and scrap at the same time. Before, I was sitting down at my desk maybe once a week because I didn't want to "leave" Brian upstairs (yes, I chose my husband over stamps and ink LOL...I feel so noble LOL). Now I have the best of both worlds!

And I have been stamping of some sort every night (well, I got into a super good book recently and just had to finish that so I did take 2 nights off). My creative mojo is slowly coming back to me...ahh...

I've been waiting to scrapbook this picture of Caitlin for over 2 years. I took it when we were in Vermont for my brother's wedding. I don't scrap events too much...I prefer having something to say with my photos....and so I tend to let my photos sit until I'm verbally inspired. I was determined to use my Scallop punch on a layout and some new paper I'd gotten and so I began flipping through my photos. When I came to this one, "Live out loud" popped into my head.
I just love the doodling trend right now and a white gel pen works wonderfully for that. It allows me to have more creative freedom, too, since I can journal on dark-colored cardstock. This Uniball pen is my favorite because it writes very smoothly with no skipping. When I pick it up, my hand just flows over the page and it's so easy to doodle!
The Well-Worn Alphabet set is another favorite of mine. I got this set during last winter's Sell-A-Bration (a great demo perk: we earn free sets during SAB, any of them from the current catalog!). It's GREAT for masculine cards (and we all know how hard those kinds of cards are to make!). The rough, distressed edges appeal to me, too. Styles like that make it much easier to stamp, since there are no worries about things looking "perfect" - the image itself is not supposed to look perfect! If you've been looking for a great masculine touch to your projects, you can't go wrong with the Well-Worn Alphabet.
I'll have some more scrapbook pages in the next few days so be sure to stop by!
Supplies: textured cardstock (Stampin' UP); Scallop Circle Punch; Lavendar Lace, More Mustard, Pink Passion cardstock (Stampin' UP); patterned paper (Die Cuts With A View); Doodle This set; Well-Worn Alphabet set; Real Red Classic Ink (SU); Whisper White Craft Ink (SU); Uniball White Gel Pen (SU)
Now go create!
-Nicole

Thursday, August 30, 2007

Lots of little tricks

I made this card last night, based on this Splitcoaststampers' (SCS) sketch challenge.

Challenges are perfect for me when it comes to creating cards. First, I love challenges! If someone gives me a goal, I go after it until I reach it. I'm persistent to a fault sometimes (i.e. I don't know when to quit). Second, the SCS challenges give me a good starting point. Scrapbooking comes naturally for me, but when I sit down to make a card, the smaller canvas creates a roadblock for me. So I need a little jumpstarting in that area.

If you've never tried an SCS challenge before, you should! There's a different one everyday of the week and it's amazing how much you'll grow as a stamper - or scrapbooker (there are scrapping challenges, too)!

So, for this card, the sketch seemed to fit a square shape best, so I made my card 4.25" square. The ribbon (from Wal-Mart) was the inspiration for my color scheme. I used Chocolate Chip, Pumpkin Pie, and Tempting Turquoise cardstock for my layers. The saying stamp is from Seasonal Whimsy and the butterfly is from a company called Club Scrap.

I utilized a lot of little tricks in the making of this card. First one: did you know your Crop-A-Dile can dry emboss little circles? It can! Besides setting eyelets and punching holes, you can put your CAD settings so that it will put tiny circle impressions into your cardstock! SUCH a FUN use of this tool (I have a couple other ideas for these circles which I'll hopefully be able to try in the next few days). I did this to my Chocolate Chip cardstock (you can click on the picture for a more detailed look).

Second trick: the edges of my cardstock were distressed with my bone folder. Normally you use this tool for scoring and folding. If you run the pointed end along the edge of your paper a few times, you'll get a cool distressed look. It will even begin to separate the layers of cardstock, which is another great shabby look.

Third trick: I wanted to clear emboss my butterfly but I wanted to stamp it in Tempting Turquoise ink. I have that color in the Classic, fast-drying dye ink only. So I stamped the butterfly in my Versamark pad first, stamped it in my Tempting Turquoise ink pad, then stamped my Pumpkin Pie cardstock. The Versamark is clear so it didn't contaminate my TT pad and the clear embossing powder stuck perfectly to the image.

I finished off the card with a couple brads and some linen thread tied around the ribbon. Try these tricks on your next project! Or go try an SCS challenge!

Now go create!
-Nicole

Wednesday, August 29, 2007

Back to school in style

Emma had her first day of first grade today. SO much was new for her (new school, new teacher, new friends, full day, etc.) that I wanted to make her something fun. Something that would make her smile and think of home when she pulled it out of her backpack.

Her school supply list included a composition book, spiral notebook, and pencils (among countless other little things..I still haven't figured out what the bag of candy and ziploc bags are for!). I'd seen so many cool and funky supplies at Target and I thought, "Surely with my considerable stash I can come up with something similar."

Stampin' UP's demonstrator magazine had a super cute pencil holder and I immediately sat down to create it. Since the pattern is online on the demonstrator side of Stampin' UP's web site, I just had to print it out right on cardstock and then cut and score. How easy is that?! I stamped the polka dots from Polka Dots & Paisley in Purely Pomegranate ink on the same color cardstock. I used Big Deal Alphabet with Whisper White craft ink to stamp out Emma's name, then heat embossed it with White Detail Embossing powder. I then took a scrap of Very Vanilla cardstock and used my spiral punch along the edge. I glued this to the top inside edge of the pencil holder. I tied some bright and fun ribbon (from Wal-Mart - I was there for rubber cement and saw their entire ribbon section was being clearanced out for pennies!) around it to finish it off.


This next notebook is the spiral bound one-subject kind. I took a sheet of patterned paper (Creative Memories) cut to the dimensions of the cover plus a 1/2 inch on 3 sides (to wrap to the inside for a cleaner look) and ran it through my Xyron 900 (thanks, Mom! I love this gift :) ).

I cut a scrap of Pumpkin Pie cardstock into 4 pieces and rounded the corners with my corner rounder punch. I used Certainly Celery and Cameo Coral ink to stamp Emma's name (Big Deal Alphabet again) on a scrap of Apricot Appeal, of which I also rounded the corners.

I had two triangular scraps of the patterned paper left, so I glued them above the "m"s in her name. That's it!


I pretty much followed the same process with this composition book. I stamped some of the animals from the Wild About You set on the paper, using More Mustard, Soft Sky, and Ruby Red ink.

I *heart* this set! When I picked it out for my free set a few months ago, I did so reluctantly. But I knew I needed a set with solid images and one that could be used for kids and babies. I didn't have anything like that in my collection (*gasp* out of 50+ sets, nothing? No, nothing). I'm SO glad I got it! I've used it on multiple techniques (kissing and faux shaving cream to name just a couple), created numerous baby cards with it (read my last post for more about that), and stamped my kids some fun things. Again, I *heart* this set!

I didn't embellish these projects much because anything lumpy would have just been knocked off. After all, these are school supplies that one would hope are going to be used for the purposes of learning LOL!

Emma was very excited about her gifts and told me she had the "coolest school stuff in the class". Take THAT, Target LOL!

Now go create!
- Nicole

Sunday, August 26, 2007

Babies Galore!

My circle of family and friends is experiencing a baby boom right now. Since March, there have been 4 babies born and my sister-in-law is expecting any hour (literally...she's a week past her due date). And there's still 2 more babies to arrive later on! This "baby boom" count does not even include the women within my Stampin' UP circle who've recently had little ones arrive.
I am One Happy Stamping Lady from all this! My baby stamps sat neglected for so long and I was wondering if I'd ever get to use them before my grandkiddos arrived (ok, I'm exaggerating there, but my point...)
What's even more wonderful about all this is that almost everyone has had a boy (there's been just one girl, to be specific). So not only have I been able to bust out the baby stamps, I've been able to stamp blues and greens! (I have 3 girls so I'm drowning in a million variations of pink and purple).
For those new arrival gifts, I've been creating thank you cards with matching envelopes. I used these pre-scored notecards and envelopes.
I've been just giddy at my craft table, giggling gleefully as I stamp blue polka-dot backgrounds and blue giraffes and - hey!- a green elephant! I pulled out a pack of baby-themed patterned paper I've had for several years and punched up the blue sheets. And I'm not done since there are more babies to come!
If you know of any little ones soon to arrive, consider stamping a gift for the baby and mom-to-be. Or just stamp a gift card holder or tag to wrap around a soft fleece blanket.
Speaking of babies, I've been getting lots of leftover packaging from baby-related items from a good friend. I plan to put it all to good use and once I do, I'll showcase here what I've made, so stay tuned!
Now go create!
- Nicole

Thursday, August 23, 2007

In need of some sunshine

My husband Brian took his vacation this week and rather than suffer another looooooong 12+hour car trip with the 3 girls (even though the final destination is always spectacular - Hilton Head, Lake Placid - ok, why are we staying here again? LOL) we decided to take it easy and stay close to home. So, we headed to Ohio to visit the Steele side of the family (Brian has 4 siblings and they all live within a few miles of his parents' home) and then drove up north to Tionesta for a few days. It rained everyday of these trips! We had planned to take the girls to Idlewild Park tomorrow but now it's going to be blazing hot. So who knows?

In any case, I love rain so the weather this week didn't bother me in the least. It felt so conducive to relaxing and taking it easy. Rainy weather always makes me want to curl up with a book and drink hot chocolate - and I did get to read a good book this week!
But I understand many of you are in need of some sunshine ;)
So here's a Stamp Club project we did at last
month's good time.

I got the pattern from the Demonstrator Side of Stampin' UP's web site (a super perk to being a demo and if you need another perk - how's 12 free ink pads sound? Check it out here---->> free ink pads then contact me!). It's a pouch with a slide out bookmark.

We used the new Wild Wasabi and Purely Pomegranate colors from the In Color line. I LOVE the new colors! These two, in particular, are well-suited to Christmas cards. I'm imagining all the fun, retro cards I can make this year with this color combo! Wild Wasabi is the perfect green for when you want something colorful without being so primary, if you know what I mean.

I'm still using my Scallop punch LOL! Seems like I use it on every project lately. You know how it is...you find an awesome color combo, or tool, or paper and you just keep using it because you're so excited about it and the ideas won't stop coming and you see what others are doing with it yadayadayada...well, that's the scallop punch for me! We're using it at next month's Technique Tuesday class for the Rubber Cement technique and also at this month's Stamp Club. I'll be posting those projects in the next few days so stop back to check them out.
Back to this project LOL...stamp sets used were Be Happy and Everyday Flexible Phrases. I used a retired Stampin' UP stamp for the bookmark saying and flowers but I received them as orphans (that is, they were not with their set) so I don't know the name. My inks were Summer Sun, Purely Pomegranate, Wild Wasabi and Basic Black. The "fun stuff" ( to me anyways LOL) are silver brads, scallop punch, blender pens, and stampin' sponges.
And about the sunshine...check out the bookmark quote ;)
Now go create!
-Nicole

Wednesday, August 15, 2007

It's amazing what you can do with a Simply Scrappin' Kit

In general, I like to take raw materials and fashion projects and embellishments from those. Kits with pre-made products had never found their way into my studio, simply because I prefer the "handcrafted touch" in a handmade object! If there are flaws in it, then all the better since it's truly unique (not to mention that by being less than a perfectionist means more crafting time!).

I had to change my tune with the Simply Scrappin' Kits, though. I've had several come my way via hostess and Sell-A-Bration benefits and *wowsers!* was I impressed! You can do SO MUCH with these kits! Sure, scrapbook pages are the obvious uses (and since the die-cuts are made from sturdy cardstock, you can really alter them up), but there are many other ways to use these kits. I recently made a funky scrapbook from the retired Friends & Flowers hostess Kit using the Jacob's Ladder album format for a graduation gift. That is, I created the physical album (not any layouts) using chipboard and the Kit. I did it in just an hour and I had to force myself to mail it out! Alas, I did not think to take a photo of it so I can't post a visual for you. Hmmm.....might have to make another LOL....

This project here is what we are doing at my Stamp Camp this Saturday. We're using the Just Delightful Simply Scrappin' Kit that was available during the 2007 Sell-A-Bration season. This entire project has just ONE stamped piece on it (and I'll leave it to you to figure out which piece that is *wink, wink*).

The card box can hold about 10 cards that are sized to fit in these small open-ended envelopes. The truly wonderful thing is that this entire project (card box and cards) used just a fraction of the Kit! So you could make several of these for gifts and it would be super-cute and super cost-effective for you!

The Saturday Stamp Camp filled up at my Sundae Spectacular back in July, which is why I never announced it. But just looking through the kit options in the Fall/Winter 2007 Collection makes me want to offer another one! I'm really loving the Winter Bright one for Christmas.

Now go create!
- Nicole

Sunday, August 12, 2007

More Faux Sponging

Here's the next project I made using the Faux Sponging technique. If you read my last post, you'll remember I received this technique in a tutorial from another Stampin' UP demo, Erika Martin. I kept my card layout the same as hers in the tutorial, but I used different colors and stamps.
When creating this card, I knew I wanted to send it to my fabulous up-upline, Cherie Hunt, as a congratulations for all her achievements and awards at the recent Stampin' UP convention. She has such a beautiful soul and is always willing to help any of us in the Creative to the Core group (and there are over 50 of us now!). Cherie works hard at her business but she does it all out of genuine love, and I'm thrilled to see her being rewarded for it.
This card measures 4-1/4" x 5-1/2" and fits in a medium sized envelope. I used Taken With Teal as my card base and smallest layer, Pink Passion for the biggest layer, and Pretty in Pink for the middle layer. I used the Heartfelt Thanks stamp set for the image and word. Both were embossed with silver embossing powder. I added silver cord as a final touch (this particular silver cord is retired, but the upcoming Holiday Mini will have elastic silver cord). The edges of my card were brushed with Versamark ink and run through a pile of silver embossing powder.
Cherie, if you're reading this, you're the best!!!!! :)
Now go create!
-Nicole

Friday, August 10, 2007

Scrapbooking is fun!!!


I've been a scrapbooker for a few years longer than I've been a stamper. I was introduced to stamping not by making a card, but by stamping on my layouts. It amazed me that I could hand make my own embellishments, dress up pre-made embellishments, and stamp out titles and journaling.

Recently, though, I've found myself stamping on everything BUT a scrapbook page. So, I had a couple hours yesterday afternoon and I decided to scrap Alaina's 7 month journaling (I've said many times that I scrap "backwards" - rather than start with photos, I start with what I want to say). You can click on each photo to see it in more detail.

What a wonderful time I had, playing with colors and words and images! I love how anything goes in this hobby: there are no rules, there are no scrapbook police who are going to come "get" me for mixing patterns and writing sideways. Ironically, I never did stamp on this layout (that's another thing about me - I rarely plan the end result of a project - I just go with the flow and am usually pleasantly surprised when I'm finished LOL!).


To make the journaling more interesting to read, I wrote it with my Uniball Signo Gel Pen, following the curve of the lemon on the paper (yes, my cardstock had a lemon image on it). When I ran out of room (I'm wordy, you know LOL) I started writing in the margins of my layout. I love my Gel Pen for writing on darker colored cardstock. It really pops and makes the words much easier to read.


Doodles are popular in the papercrafting industry right now. Of course there are stamped images available (Doodle This and Double-Line Doodles are favorites of mine) if you are convinced you can't doodle or just don't want to. But for this layout, I glued down some paper flowers and used my Uniball Signo Gel Pen to draw swirls and dots between the flowers. To illustrate how much I do not plan my projects, I grabbed a handful of the paper flowers, tossed them on my page, and glued them where they fell.


Here's another page element I wanted to show you. I received a tutorial the other day from another Stampin' UP demo, Erika Martin, on embossing shelf liner. I used the technique to make a card (that will be in my next post) and since I had some scraps leftover, I decided to use them on my layout.

To make these embellishments, I pressed the shelf liner into my Versamark pad, coated it with embossing powder, then melted it with my heat gun. I attached a paper flower to it with a brad, then glued it down with a mini glue dot. Don't you just LOVE this look?

This weekend I challenge you to find something ordinary around your house and find a way to incorporate it into your craft project. Maybe you have some old keys lying around - press them into acrylic paint and then "stamp" on your paper with it. Use kitchen string to create a fun photo frame. At this Tuesday's Technique class, we'll be using wax paper on our cards to make a cool resist.

Now go create!
- Nicole

Thursday, August 9, 2007

Christmas in August

I know it's usually "Christmas in July", but who really gets ready for it in July anyways? Ok, my grandmother does - wait, she's actually DONE by July - she shops the after Christmas sales for NEXT year's holiday. Grandma always was very organized.

But I digress LOL!


This card was one of the Make & Takes at my Sundae Spectacular back in July (so maybe I can legitimately say "Christmas in July"). I had received the Perfect Presentation set free from Stampin' UP and it's all Christmas stamps. At first I hadn't planned on using it at my event, but then I got my new In Color toys and when I saw the Purely Pomegranate and Wild Wasabi together, I KNEW this was what I wanted to create.

The size of this card is 2-3/4" x 5-1/2". It fits perfectly in a regular letter size envelope or these small open-end envelopes. Another nice thing is that you get 3 of this size from one 8-1/2" x 11" sheet of cardstock with just an itty bitty strip leftover.

Using Purely Pomegranate ink, I stamped the star image from Perfect Presentation in a random fashion on the Purely Pomegranate card base. I then cut a 5-1/2" piece of Wild Wasabi double-stitched ribbon and used SNAIL adhesive on each end to attach it to the card. I stamped the Christmas tree image in Wild Wasabi ink onto Whisper White cardstock. After brushing the edges of it with Purely Pomegranate ink, I glued it to a piece of Wild Wasabi cardstock. I then glued the entire piece over top the ribbon and onto the card base.

I thought I was finished at this point, but I sat there staring at it, thinking, "It needs something more." Now, it's very hard for me to make a simple card (it's hard for me to do ANYTHING the simple way, come to think of it. My husband always accuses me of this LOL). So, I was sort of doubting my instinct that it needed "something else". I kept whispering, "Keep it simple, keep it simple." My hand crept towards the Dazzlin' Diamonds glitter jar. I snatched it back, again whispering, "Keep it simple." I picked up the Liquid Glue pen and twirled it in my fingers. Another voice (louder) said, "Must resist!" I then screamed, "I CAN'T!!!!" and ripped the cap off the Liquid Glue, squeezed an outline of it around the Christmas tree, and dumped Dazzlin' Diamonds glitter all over it!!!!!!

After shaking the excess off, I seeing the final result, I realized I'd done the right thing. Glitter was just what it needed! And the best part was it looks like pretty soft snow on the tree! (You can click on the photo to see it in more detail). Lesson learned: Bling makes it better LOL!

Now go create!
- Nicole