Sunday, July 29, 2007
A great case of improvisation
Thursday, July 19, 2007
You can't judge a book by its cover


The sun is made from some handmade paper I cut into a circle (traced using the lid of a salsa jar) and the rays are vintage book paper. I used Tempting Turquoise and Ruby Red ink to stamp inspirational words using Everyday Flexible Phrases and Expressive Flexible Phrases (this latter set is retired).
I had just gotten Well-Worn Words as one of my Sell-A-Bration redemption sets (gotta love being an SU! demo!) and thought the style fit these journals perfectly. I stamped "Pray" in Chocolate Chip ink, then inked the torn cardstock edges with Ruby Red and Tempting Turquoise ink.
The finishing touch was to tie all kinds of fun ribbon down the spine of the journals. Not only does it make the journals funky-looking, but it's a great way to use up ribbon scraps. Ribbon is too awesome to waste a single inch, you know!
I so thoroughly enjoyed creating these! When I got Emma's school supply list for a few weeks ago, I saw she needed a sprial-bound notebook. Well, guess who's kid will have the coolest looking Meade in first grade ROFL! I'm thinking this paper will work perfectly. Those bright colors - WoW!
As always, thanks for looking.......
Now go create!
- Nicole
Friday, July 13, 2007
Where did my crafting time go?!?!
The good news is I got to use Wild Wasabi ink and cardstock and I at least handled the Wild Wasabi double-stitched ribbon (which will be a part of my project). Oh, and I used my new scallop circle punch. So it hasn't been a total bust.
I still have other projects to show you, though! I know SOOOO many ladies having babies, or who just had babies and it's been great because I get to pull out my baby stamps, which sat unused for too long. Here's a card I did for a couple who just had their sweet little ones.

I got this set, Wild About You, in the mail recently as part of a Stampin' UP demonstrator promotion (can I just say how much I LOVE this company?) and I've been having a blast with it. Because of the solid images in this set, you can do a variety of techniques (like kissing and a faux shaving cream background, both of which I've done at my monthly technique classes). Plus, the animals can be used for little boy or girl projects.
I used the card sketch from this SCS challenge.
Supplies all SU!, unless noted : (stamps) Wild About You, Big Deal Alphabet, Expressive Flexible Phrases (paper) Bashful Blue, Certainly Celery, Barely Banana, Whisper White (ink) Brocade Blue, Certainly Celery, More Mustard (other) Round Tab Punch, Cuttlebug Tiny Dots Embossing Folder, sewing machine and thread
Now go create!
---Nicole
Tuesday, July 10, 2007
I've got that "stamping high"!
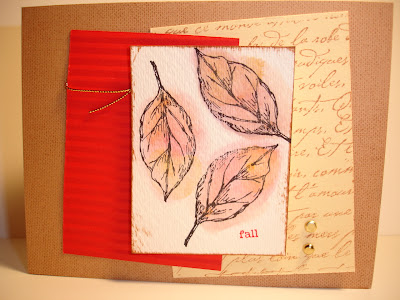
Here's one of the cards we did tonight. This one features Watercolor Monet.

Click here to see what next month's class is all about---->>> Technique Tuesdays Class
Supplies, all Stampin' UP: (stamps) Natural Beauty, French Script, Linen, Everyday Flexible Phrases (Paper) creamy caramel, barely banana, real red, watercolor (Ink) creamy caramel, real red, Jet Black Staz-Ongold cord, gold brads, crimper, Watercolor Wonder Crayons, sponge daubers
Now I'm really looking forward to tomorrow - I should have some decent crafting time as we're home all day and all night, PLUS there's very little housework to be done! Yay! I have a box of new toys arriving from Mr. Brown tomorrow so it's perfect timing. Tune back to see what comes out of it!
Monday, July 9, 2007
Can ya feel the heat?
 We have no air conditioning in our home - which is brick, by the way - and it is now much toastier on the inside than the outside. Brian and I contemplated pitching a tent in the yard and sleeping under the stars LOL!
To make this, cut a strip of paper slightly longer than the width of your card (i.e. if your card is 8-1/2" wide, cut the strip 8-3/4"). Score 3" in on both sides, then score at 4-3/8" (the halfway point). Fold your cardstock at that halfway point, then fold going the opposite direction each end at the 3" score marks. Use a punch to create the frame in the strip.
Thursday, July 5, 2007
God's Little Blessings
 Once you read far enough into this post, you may be scratching your head at what, exactly, is God's blessing in all this. But you'll see at the end!
We had MAJOR rain all morning - several inches in just a couple hours. In the past, our basement would have flooded but since waterproofing it 15 months ago, we'd had no problems. Well, we'd spent the time and money turning it into a family room and now we were waiting for the carpet to be installed.
I suddenly remembered I'd left the phone downstairs and as I dashed down to get it, that's when I saw a trickle of water coming in under the baseboards. While I'm panicking, two more trickles stream out and it soon becomes a puddle. I look up and see our window wells filled with about 8 inches of water. Now the water is seeping in through the sill and streaming down the brand new walls!
To further complicate matters, I had to pick up Caitlin and Alaina from Mother's Morning Out.
Here's where God's blessings come in - Melissa, the woman in charge of MMO, was so very sweet and kind enough to offer to drive the girls home. I felt very thankful for the relationships I'd formed at St. Stephen's Church over the past three years. Here's another of God's blessings - I didn't really need to go downstairs to get the phone, yet God sent me there so that I would catch the water coming in just as it started, preventing costly damage and more hours of remodeling. And here's yet another blessing - yes, I spent an hour in the midst of the heaviest downpours, using a bucket to bail out our window wells, butEmma, my oldest, was a HUGE help and when the heavy rains ended, so did our water leakage. Praise the Lord!
Did you all have a great Fourth of July? We had a coo
If you have Stampn' Pastels, they are a great coloring medium for highlighting text, journaling, and titles.
And don't discount the beauty of your own handwriting! I see so much computer-generated journaling and it's far less interesting than handwritten words. If a total stranger is enthralled with your handwriting, imagine how treasured your own words would be to your family!
Now go get creative!
Monday, July 2, 2007
The Second Day

Woo-hoo, second day on the blog!
This is a card I made awhile back for a workshop on watercoloring. The hostess had requested this technique and I was oh-so-happy to oblige! (I love hostesses with a sense of adventure ;) ). I needed a very simple project and this 3x3 gift card is what I came up with. The size is adorable, the colors are so fun and so is the stamp set - Polka Dots & Paisley.
I cut a 3x6 piece of Lovely Lilac cardstock (tip: using a 12x12 sheet allows you to get 8 of these without any leftover scraps), scored at the 3" mark on the long side, then folded. Using Elegant Eggplant ink, I stamped the polka dots in the center. Then I used Staz-On Jet Black to stamp the paisley on Naturals Ivory cardstock and colored it in with Bold Brights Watercolor Wonder Crayons and an Aquapainter. I cut this out and glued it to the center of the gift card.
Using the uber-cool Round Tab Punch, I punched a tab from Yoyo Yellow cardstock, folded it, and used SNAIL to adhere it to the top left of my card. I stamped "laugh" and "*" from Everyday Flexible Phrases on the tab. The great thing about that set is it has 56 words and symbols in it, so you can make your cards say whatever you want them to!
You know you want to be a "charter reader" of this blog, so sign up over to the left and consider it done...and thanks for reading!

